
10 Creative Ways to Upcycle and Repurpose Your Custom Scarves
Content
10 Creative Ways to Upcycle and Repurpose Your Custom Scarves
Why Upcycle? The Sustainability it Offers
What You Need Before You Start
Match the Right Fabric to Your Project
Gather Your Essential Tools
10 Creative Projects to Give Your Scarves a Second Act
No-Sew Scarf Projects for Instant Gratification
1-Instant-Gratification Pillow Cover
2-Sentimental Scarf as Framed Art
3-Furoshiki-Inspired Gift Wrap
4-Celebratory Bunting & Garland
5-Chic Handbag Handle Wrap
6- Effortless Hair Accessories
7- Embellished T-Shirt with Scarf Pocket
8- Aromatic Drawer Sachet
9- Patchwork Zipper Pouch
10- Artisan Camera Strap
Caring for Your Upcycled Treasures
Final Words
Look inside your closet, and you will likely find a collection of unworn scarves. You hold onto them for good reasons. A scarf might be a reminder of a memorable trip, a gift from someone special, or a custom piece with a one-of-a-kind design. These items are connected to your memories and sense of self, which makes them hard to let go.
This is where upcycling scarves provides a perfect solution. The process is more than just reusing an old item.
It honors the past by creating something new and useful for your present. When you repurpose a scarf, you give that memory a new context and a new story to tell. This guide will help you see your custom scarf collection as a palette of possibilities, ready to be reimagined.
Why Upcycle? The Sustainability it Offers
Upcycling is the process of turning unwanted items into new products of higher quality and value. Unlike recycling, which breaks down materials, upcycling creatively repurposes an item's original form. This practice offers a powerful response to the effects of fast fashion.
The textile industry uses a vast amount of resources. For example, making a single cotton t-shirt requires about 2,700 liters of water. By upcycling scarves, you help reduce landfill waste and conserve precious resources like water and energy.
Beyond the environmental benefits, upcycling is a deeply creative and personal activity. It gives you a chance to create one-of-a-kind pieces that express your unique style, away from mass-produced trends.
The process itself can be therapeutic and enjoyable, allowing you to experiment with new skills. It also saves money by extending the life of items you already own. Choosing to upcycle helps you build a more meaningful connection to your clothing.
What You Need Before You Start
Match the Right Fabric to Your Project
The success of any upcycling project begins with understanding your material. A scarf's fabric influences its durability, appearance, and the best projects suited for it.
-
Cotton: This natural fiber is durable and easy for beginners to work with. Its sturdiness makes it ideal for items that need to withstand wear, like tote bags or pillow covers.
-
Silk and Satin: These fabrics are luxurious and have a beautiful, fluid drape. Due to their delicate nature, they are best for decorative items like framed art or hair accessories, where a high-quality or custom print can be the main feature.
-
Wool: Known for its warmth, wool can be "felted" by washing it in hot water. This process creates a thick, dense fabric that does not unravel when cut, perfect for creating structured pouches or appliques.
-
Linen: Like cotton, linen is strong and breathable, making it great for beginners. It is an excellent choice for lightweight bags or home decor items like drawer sachets.
-
Synthetics (Polyester, Rayon): These fabrics vary widely. Polyester is durable, while rayon has a fluid drape similar to silk. It is important to identify them, as many can melt under a hot iron, making them more suitable for no-sew projects.
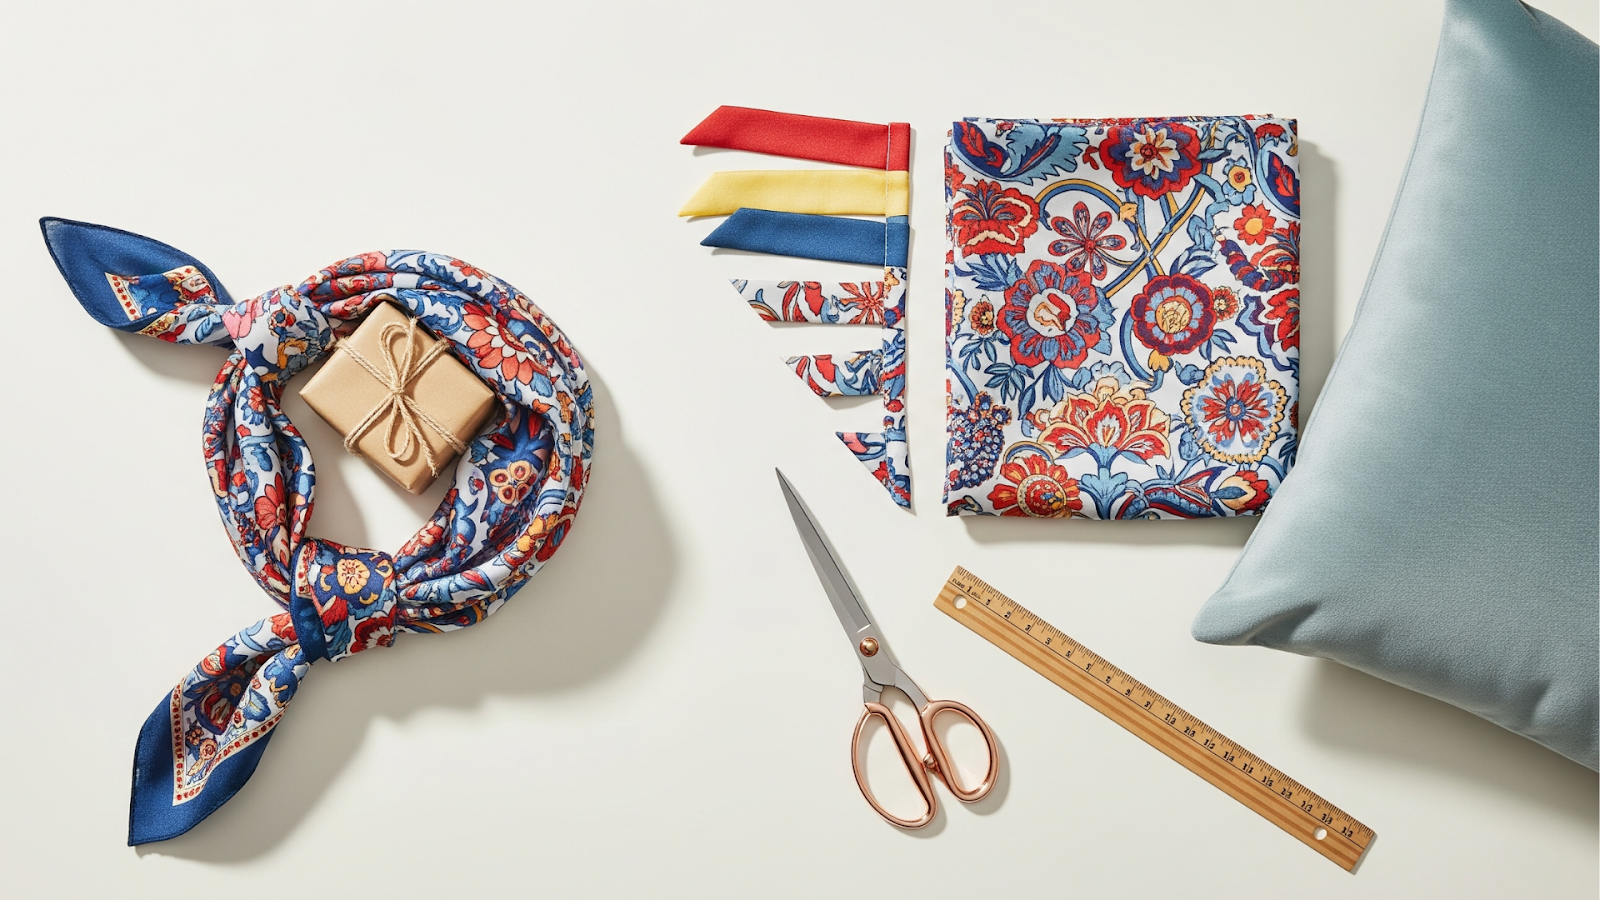
Gather Your Essential Tools
Gathering the right tools will make your upcycling experience smoother and more enjoyable. You do not need everything at once, but having a few key items on hand can make a big difference.
For no-sew projects, you will want high-quality fabric scissors for clean cuts , a rotary cutter and self-healing mat for precision , and a good fabric glue that dries clear and flexible. Iron-on adhesive tape is another important tool for creating hems without a needle and thread.
For sewing projects, you will also need a basic sewing machine with a straight stitch. The correct needle is crucial. Use a sharp Microtex needle for delicate fabrics like silk to avoid snags and pulls. For holding slippery fabric in place, use extra-fine silk pins or sewing clips that will not leave permanent marks.
10 Creative Projects to Give Your Scarves a Second Act
Here are ten projects designed to transform your beloved scarves into new treasures. They range from simple no-sew creations to beginner sewing challenges.
No-Sew Scarf Projects for Instant Gratification
1- Instant-Gratification Pillow Cover
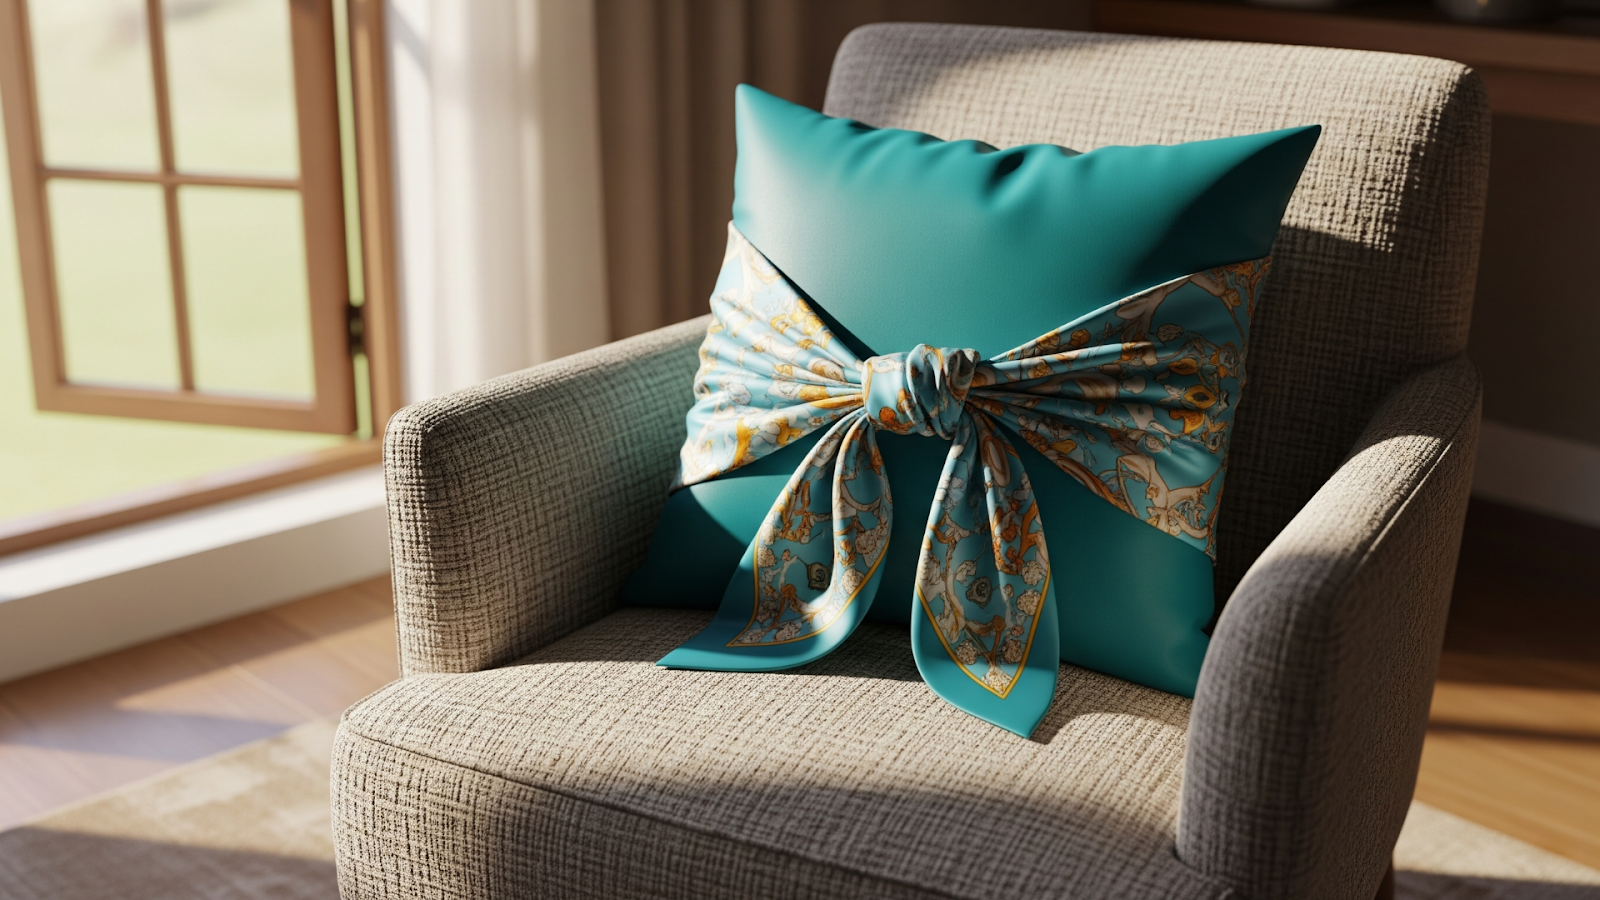
Give a tired throw pillow a vibrant makeover in just a few minutes. This project is perfect for showcasing a large, beautifully patterned scarf, where the quality of a well-made or custom design can truly stand out.
What You'll Need:
-
One large square scarf, at least twice the width of your pillow
-
One throw pillow
Instructions:
-
Lay your ironed scarf flat in a diamond shape.
-
Place your pillow in the center.
-
Fold the bottom corner of the scarf up and over the pillow, then fold the top corner down to overlap it.
-
Bring the left and right corners to the center and tie them together in a secure double knot.
-
Style the knot into a decorative bow or tuck the ends neatly underneath for a polished finish.
Expert Tip: For slippery silk scarves, use a few small safety pins on the back to fasten the overlapping layers. This keeps the cover from shifting with use.
2- Sentimental Scarf as Framed Art
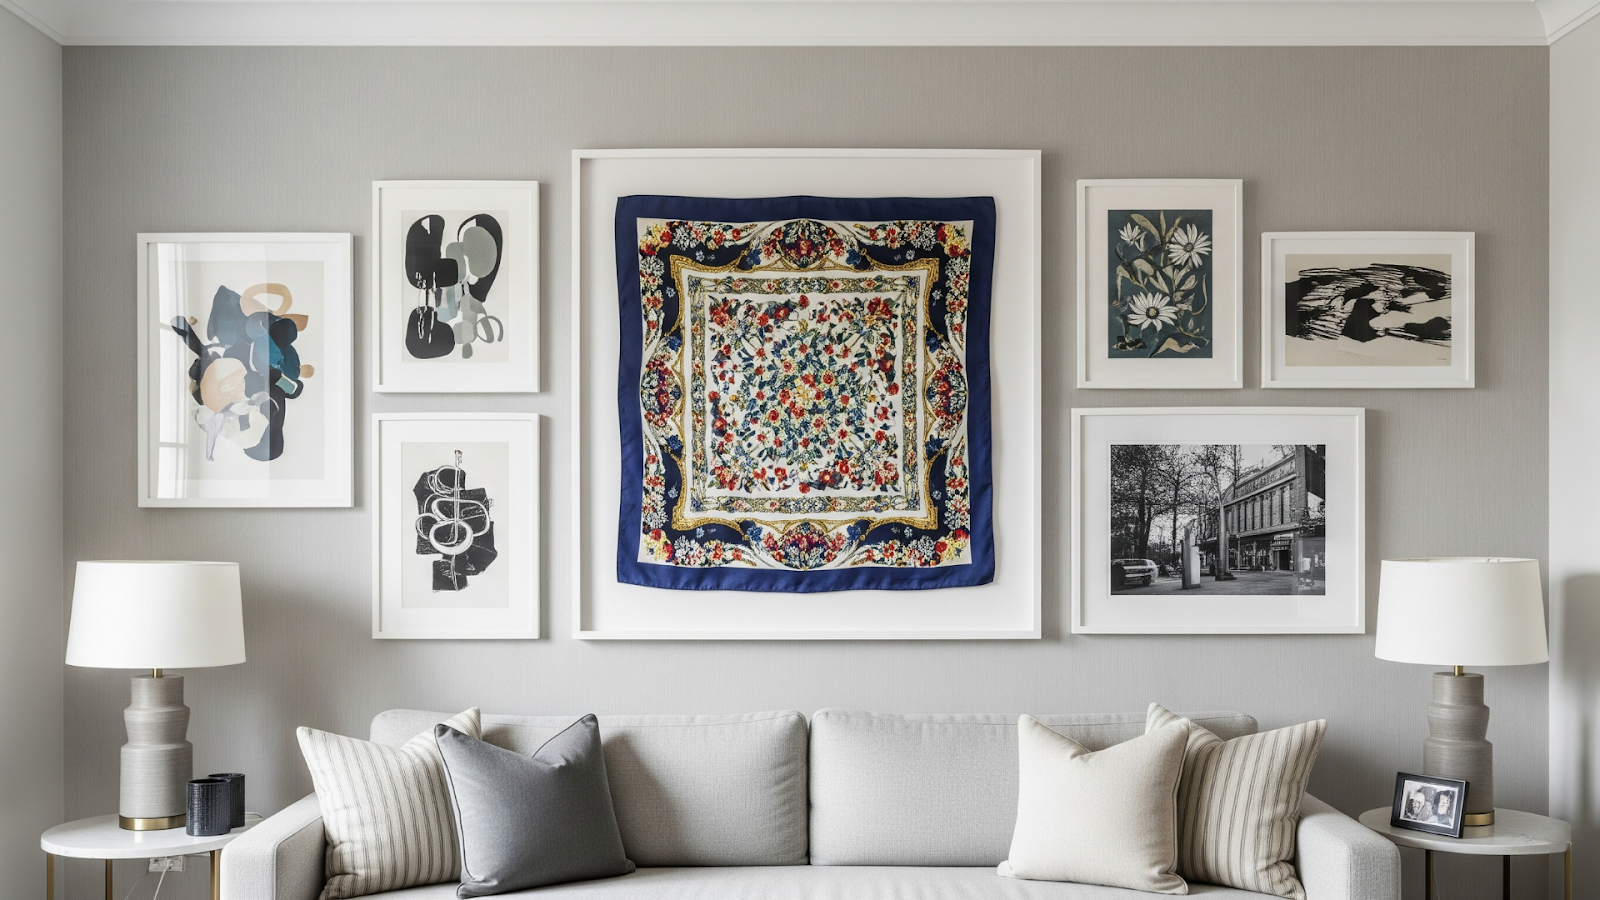
Upcycle a particularly beautiful scarf, especially one with a unique custom print, from a drawer to a gallery wall. This turns it into a permanent piece of art that tells a story.
What You'll Need:
-
One scarf with a striking print
-
A picture frame, ideally a shadow box
-
Acid-free foam core or mat board
-
Acid-free fabric tape or stainless steel pins
Instructions:
-
Carefully iron the scarf on a low setting, using a pressing cloth to protect it.
-
Cut a piece of acid-free foam board to fit inside your frame.
-
Center the scarf on the board, then gently wrap the edges around and secure them to the back with fabric tape or pins. Apply even tension to avoid puckering.
-
Place the mounted scarf into the frame and secure the backing.
Expert Tip: For a truly valuable heirloom, consider an archival mounting method. This involves hand-stitching the scarf to a fabric-covered board and using UV-protective glass to prevent fabric damage over time.
3- Furoshiki-Inspired Gift Wrap
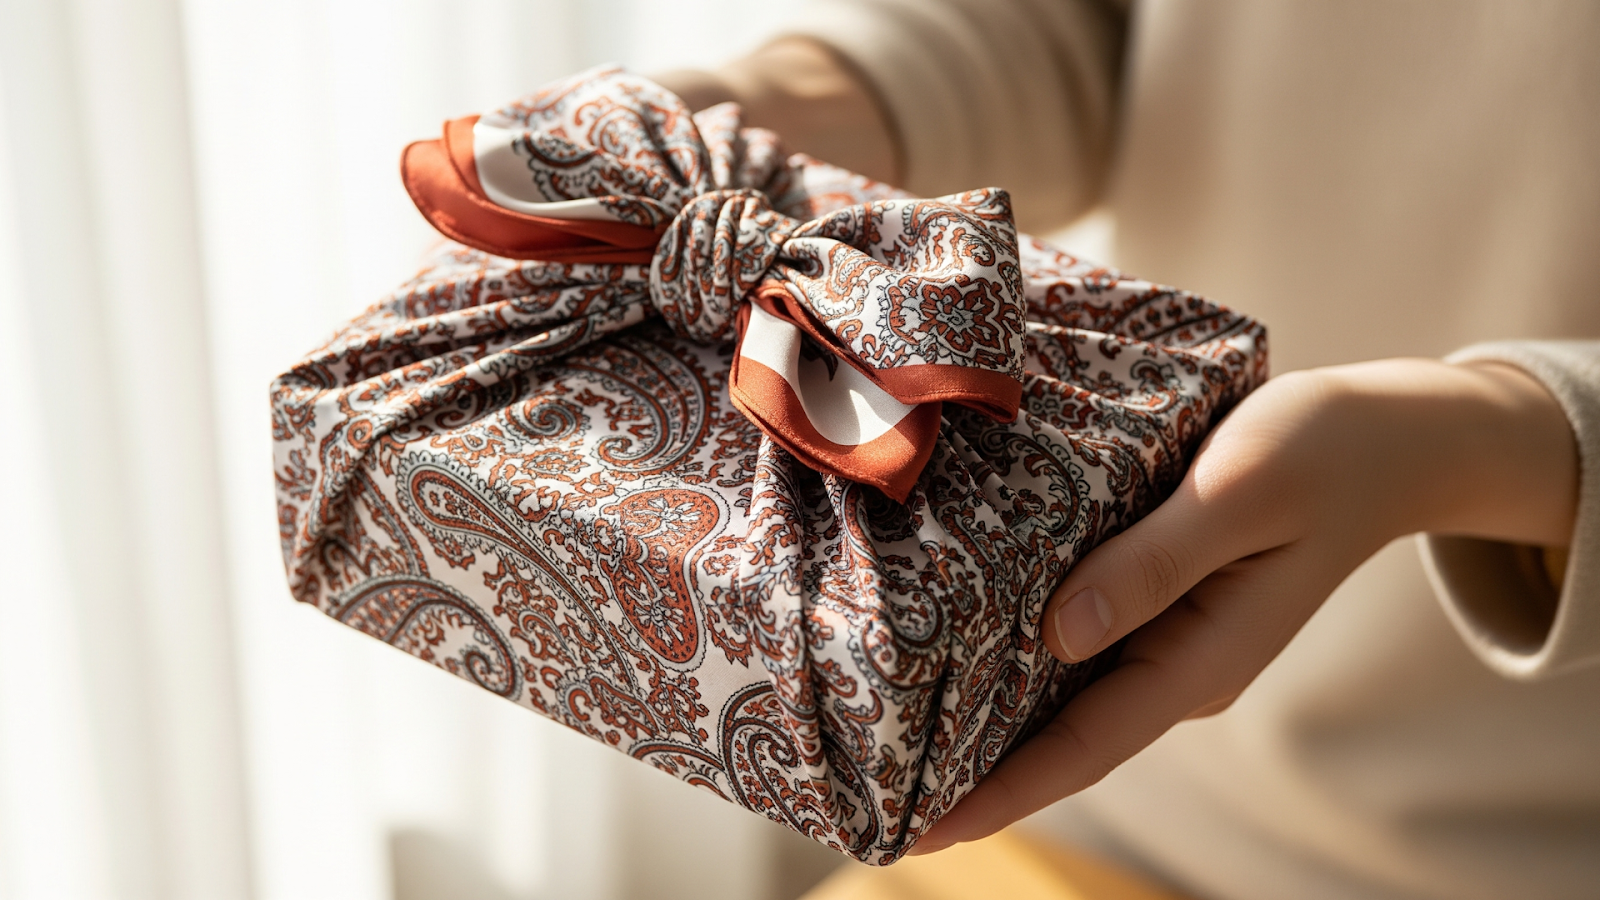
Furoshiki is the traditional Japanese art of wrapping gifts in fabric. Using a quality scarf as gift wrap is a sustainable choice that makes the wrapping part of the gift itself.
What You'll Need:
-
One square scarf made of silk, cotton, or linen
-
Your gift, such as a bottle or box
Instructions (for a bottle):
-
Lay the scarf flat in a diamond shape and place the bottle in the center.
-
Bring the top and bottom corners up and tie them in a secure double knot over the top of the bottle to form a handle.
-
Take the left and right corners and wrap them around the body of the bottle toward the front.
-
Tie these corners in a neat knot at the front to secure the bottle.
Expert Tip: The fabric weight is key. Lightweight silks work well for irregularly shaped gifts, while crisp cottons are better for creating the sharp folds needed for wrapping boxes.
4- Celebratory Bunting & Garland
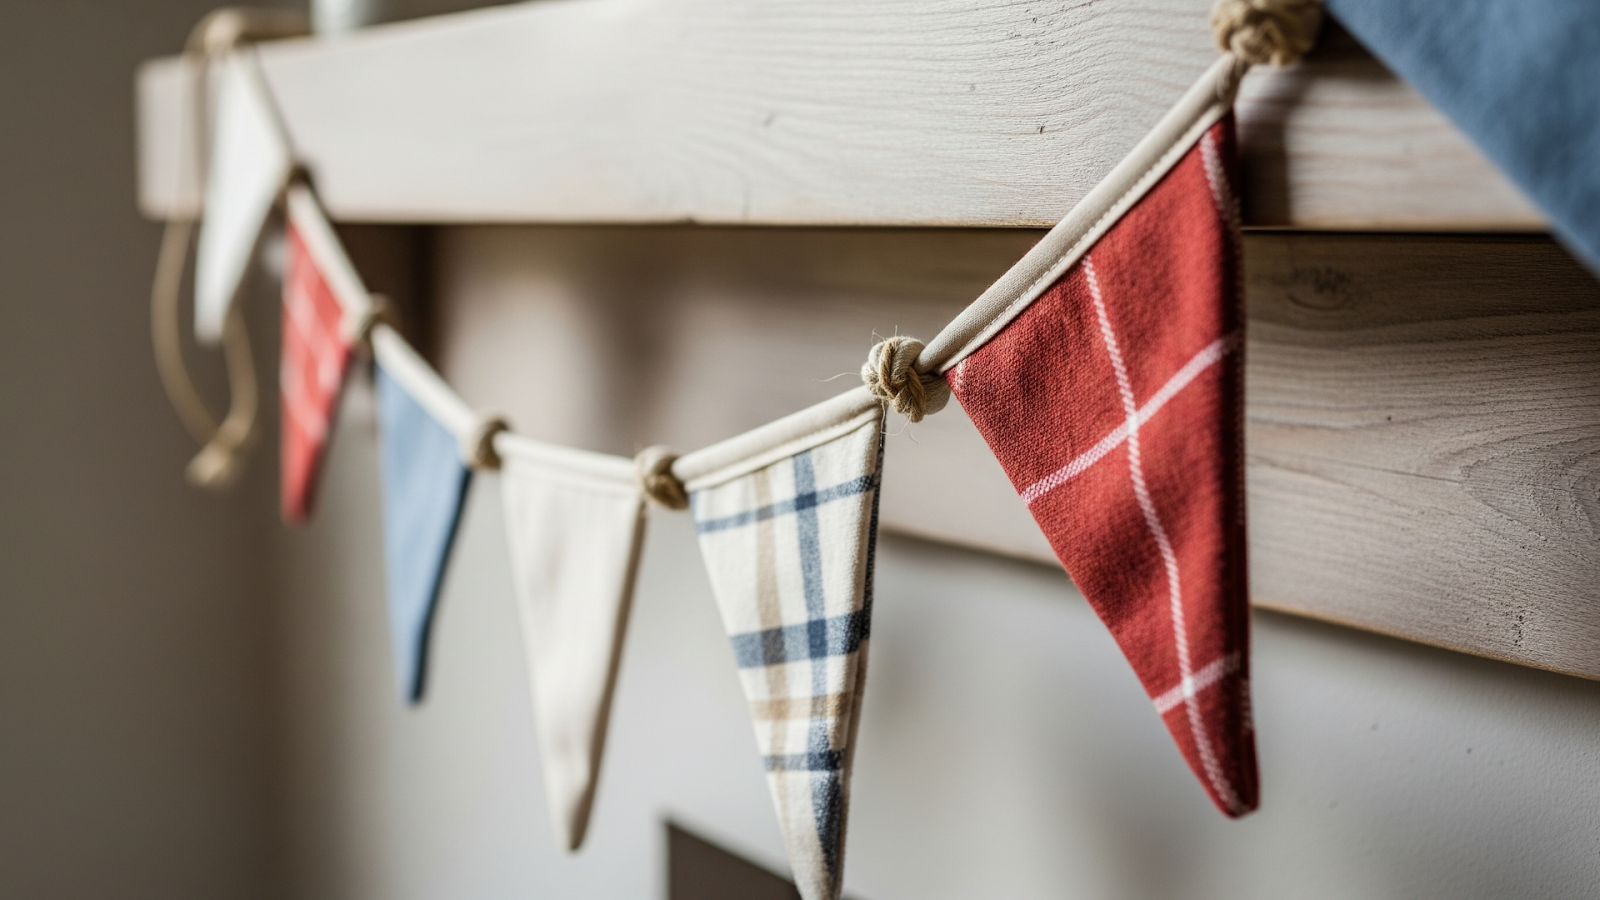
Create festive, reusable decorations perfect for parties or everyday home decor. This project is ideal for using a collection of scarves in a similar color palette.
What You'll Need:
-
Several scarves (cotton or fleece work well)
-
Twine or ribbon
-
Fabric scissors
Instructions (for a rag tassel style):
-
Cut or tear your scarves into long strips, about 1-1.5 inches wide and 18-20 inches long.
-
Take one strip and fold it in half to create a loop.
-
Place the loop under your length of twine, then pull the two tails of the strip through the loop to secure it. This is called a lark's head knot.
-
Repeat with the remaining strips, pushing them snugly together on the twine.
Expert Tip: For a no-fray triangle flag bunting without sewing, use a fabric stiffener or bond the scarf fabric to a thin sheet of felt before cutting out the shapes. This gives the flags body and ensures clean edges.
5- Chic Handbag Handle Wrap

Instantly elevate a simple handbag and protect its handles from wear by wrapping them with a long, thin silk scarf, often called a "twilly".
What You'll Need:
-
One long, narrow scarf
-
A handbag with a firm handle
Instructions:
-
Find the midpoint of your scarf and place it at the center of the handbag handle.
-
Wrap one tail of the scarf tightly and diagonally around the handle, moving from the center toward the base. Each wrap should slightly overlap the last.
-
When you reach the base, secure the end with a tight double knot around the handle's hardware.
-
Repeat with the other tail, wrapping in the opposite direction, and secure it with another knot.
Expert Tip: Wrapping tightly is crucial to prevent a slippery silk scarf from unraveling with use. Don't be discouraged if it takes a few tries to get it right.
6- Effortless Hair Accessories
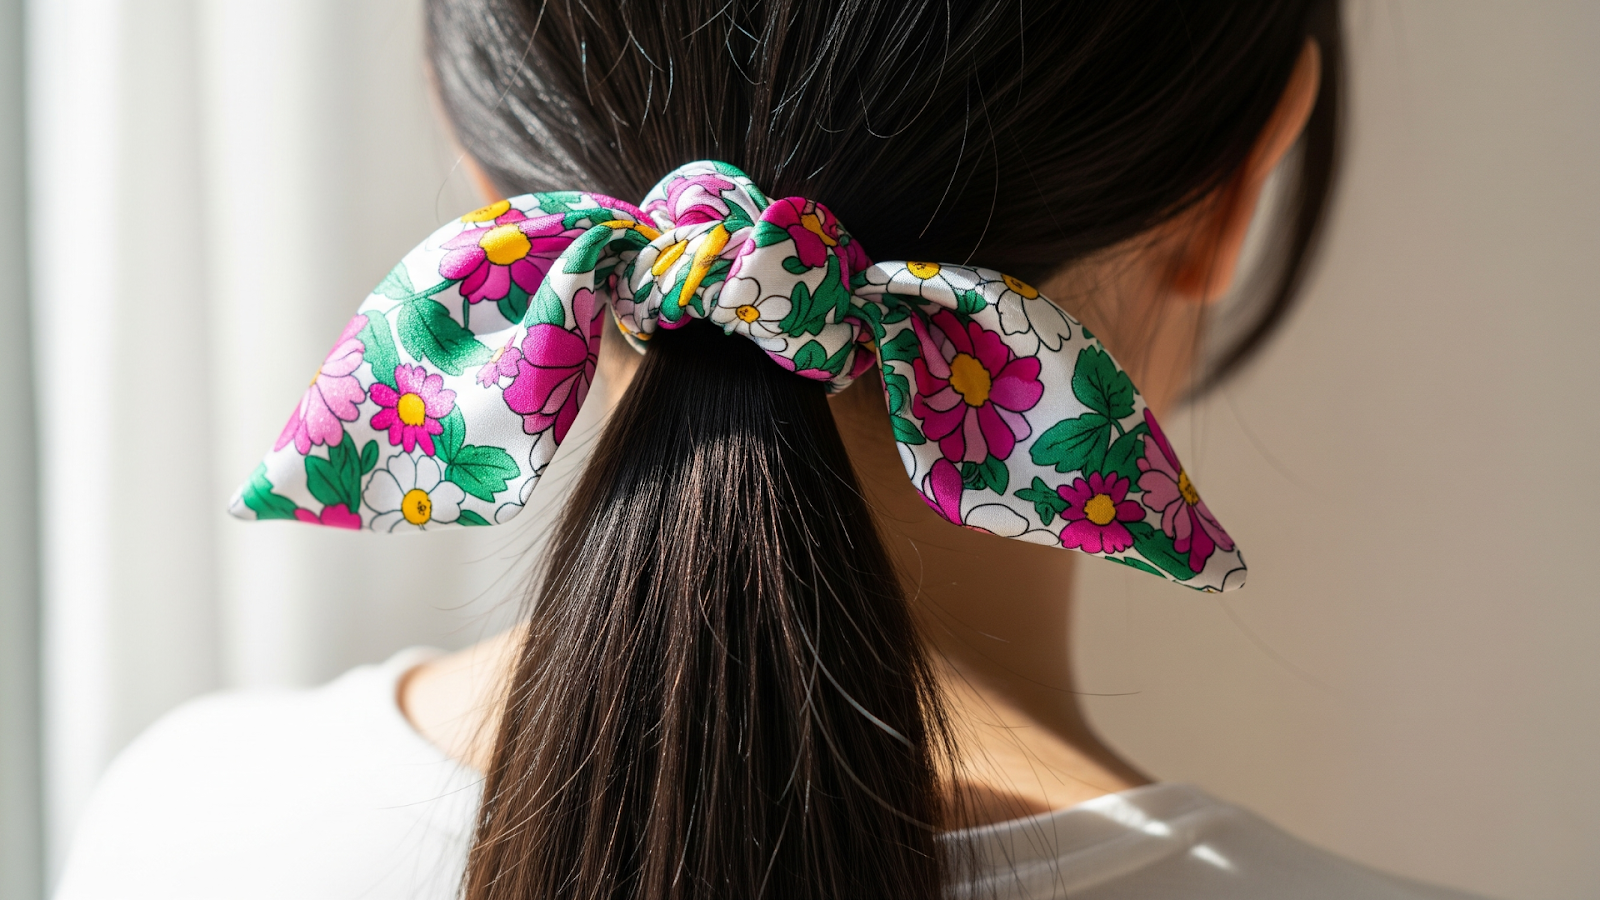
Transform small scarves or leftover fabric scraps into a variety of stylish hair accessories.
What You'll Need:
-
A small scarf (silk or cotton work well)
-
A standard hair tie
Instructions (for a faux scrunchie):
-
Tie your hair into a ponytail or bun with the regular hair tie.
-
Take a small square scarf and tie one corner onto the hair tie.
-
Wrap the rest of the scarf around the hair tie, fluffing the fabric as you go to create a voluminous look.
-
When you reach the end, tie the final corner to the hair tie and tuck in the ends.
Expert Tip: Create a posable wire headband by inserting a piece of flexible floral wire into a fabric tube made from a rectangular scarf. This gives the headband a more structured and customizable shape.
Beginner Sewing Projects to Hone Your Skills
7- Embellished T-Shirt with Scarf Pocket
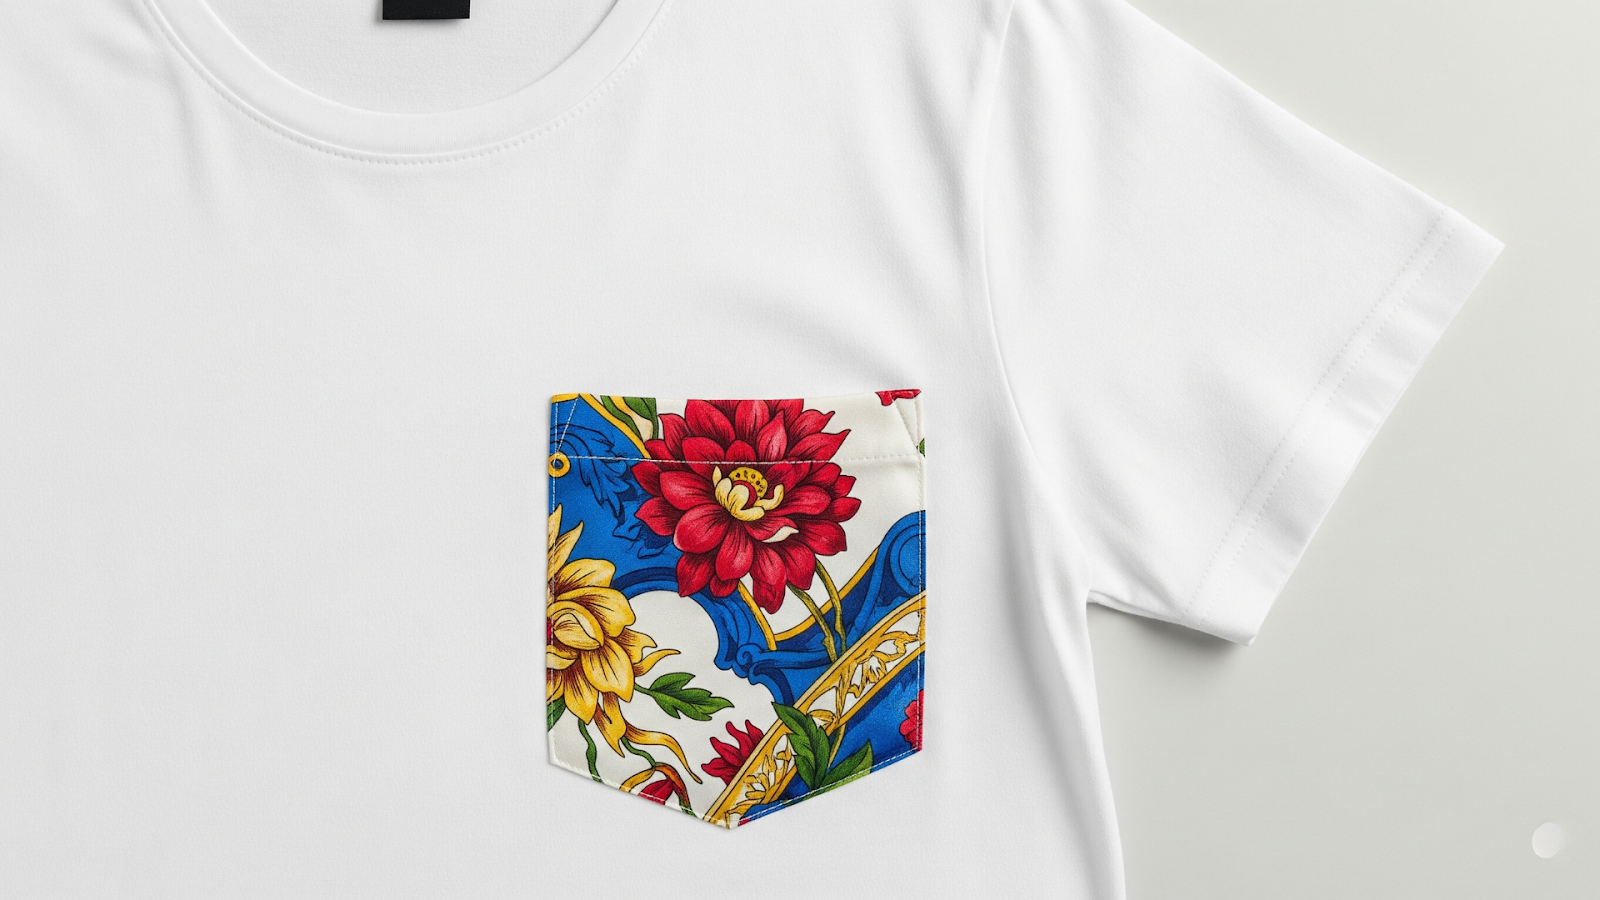
Add a pop of pattern and luxury to a plain t-shirt by sewing on a pocket made from a high-quality silk scarf.
What You'll Need:
-
A plain t-shirt, pre-washed
-
A silk scarf
-
Lightweight fusible interfacing
-
Pocket template and basic sewing supplies
Instructions:
-
The most critical step is to stabilize the silk. Iron a piece of fusible interfacing onto the back of your scarf. This prevents the delicate fabric from stretching or shifting.
-
Use a template to cut your pocket shape from the interfaced section of the scarf.
-
Fold and stitch the top edge of the pocket to create a clean hem. Fold and press the other three sides to the back.
-
Pin the prepared pocket onto the t-shirt and carefully topstitch around the three sides.
Expert Tip: Always use a Microtex or "sharp" needle (size 70/10) when sewing with silk. A universal needle can snag the delicate threads and create runs in the fabric.
8- Aromatic Drawer Sachet
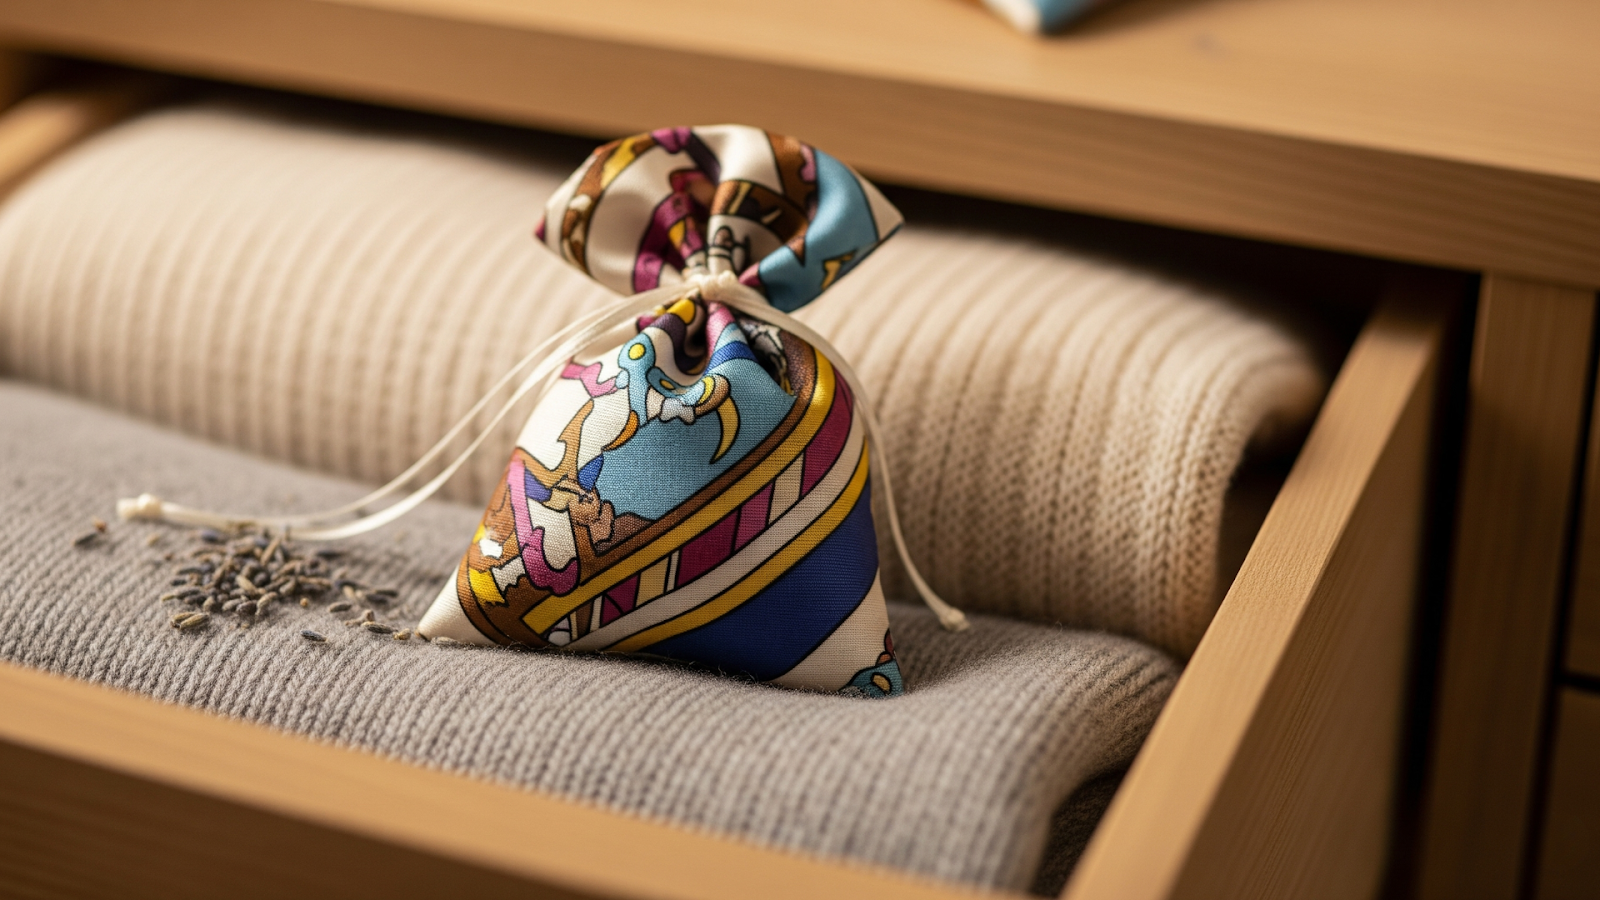
Craft beautiful sachets to perfume your drawers and closets. This is a perfect project for using up small scraps from a favorite scarf.
What You'll Need:
-
Scarf scraps (cotton, linen, or silk)
-
Lining fabric, like cotton muslin
-
Filling: Dried lavender, cedar chips, or grated scented soap
-
Basic sewing supplies
Instructions:
-
For each sachet, cut two identical shapes (e.g., squares or hearts) from your scarf fabric and two from your lining fabric.
-
Place one lining piece on the wrong side of one outer fabric piece and sew them together around the edges. Repeat for the second set to create two lined panels.
-
Place the two panels with their right sides together and sew around the perimeter, leaving a small opening for turning and filling.
-
Clip the corners, turn the sachet right side out, and fill it with your chosen aromatic filling. Grated scented soap provides a very long-lasting fragrance.
-
Fold the raw edges of the opening inward and sew it closed with a neat hand stitch.
Expert Tip: For a more professional finish, create a separate inner pouch from muslin for the filling. This prevents fine particles from escaping and allows you to wash the decorative outer cover.
9- Patchwork Zipper Pouch
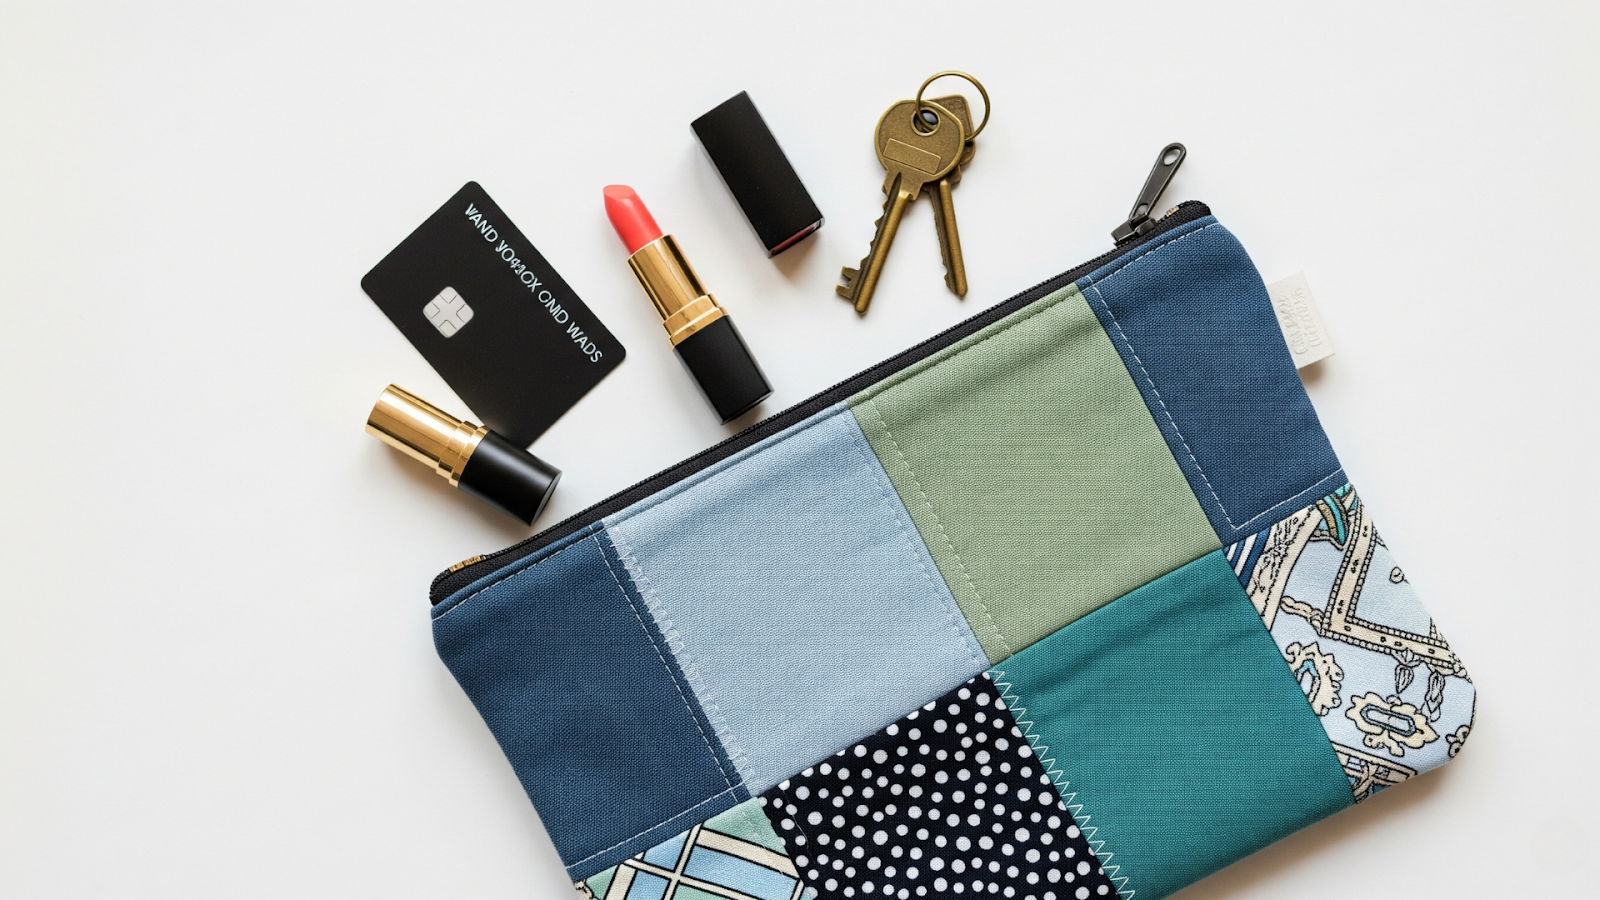
This project is fantastic for using the smallest scarf scraps and for practicing skills like patchwork and inserting a zipper.
What You'll Need:
-
Various scarf scraps (cotton is easiest for beginners)
-
Lining fabric and fusible fleece
-
A zipper
-
A sewing machine with a zipper foot
Instructions:
-
Sew your scarf scraps together to create two rectangular patchwork panels for the pouch exterior.
-
Iron fusible fleece onto the wrong side of your two exterior panels for stability.
-
Attach the zipper by sewing it between the exterior panels and the lining panels, creating a "zipper sandwich". Use a zipper foot for this step.
-
Once the zipper is attached, open it halfway. This is crucial for turning the pouch later.
-
Place the exterior panels right sides together and the lining panels right sides together. Sew all the way around, leaving a 3-4 inch hole in the bottom of the lining.
-
Turn the pouch right side out through the hole in the lining, then sew the lining hole closed.
Expert Tip: To use very tiny scraps, try the "Quilt As You Go" method. Sew your scraps directly onto a panel of batting one by one, which quilts the panel as you piece it together.
10- Artisan Camera Strap
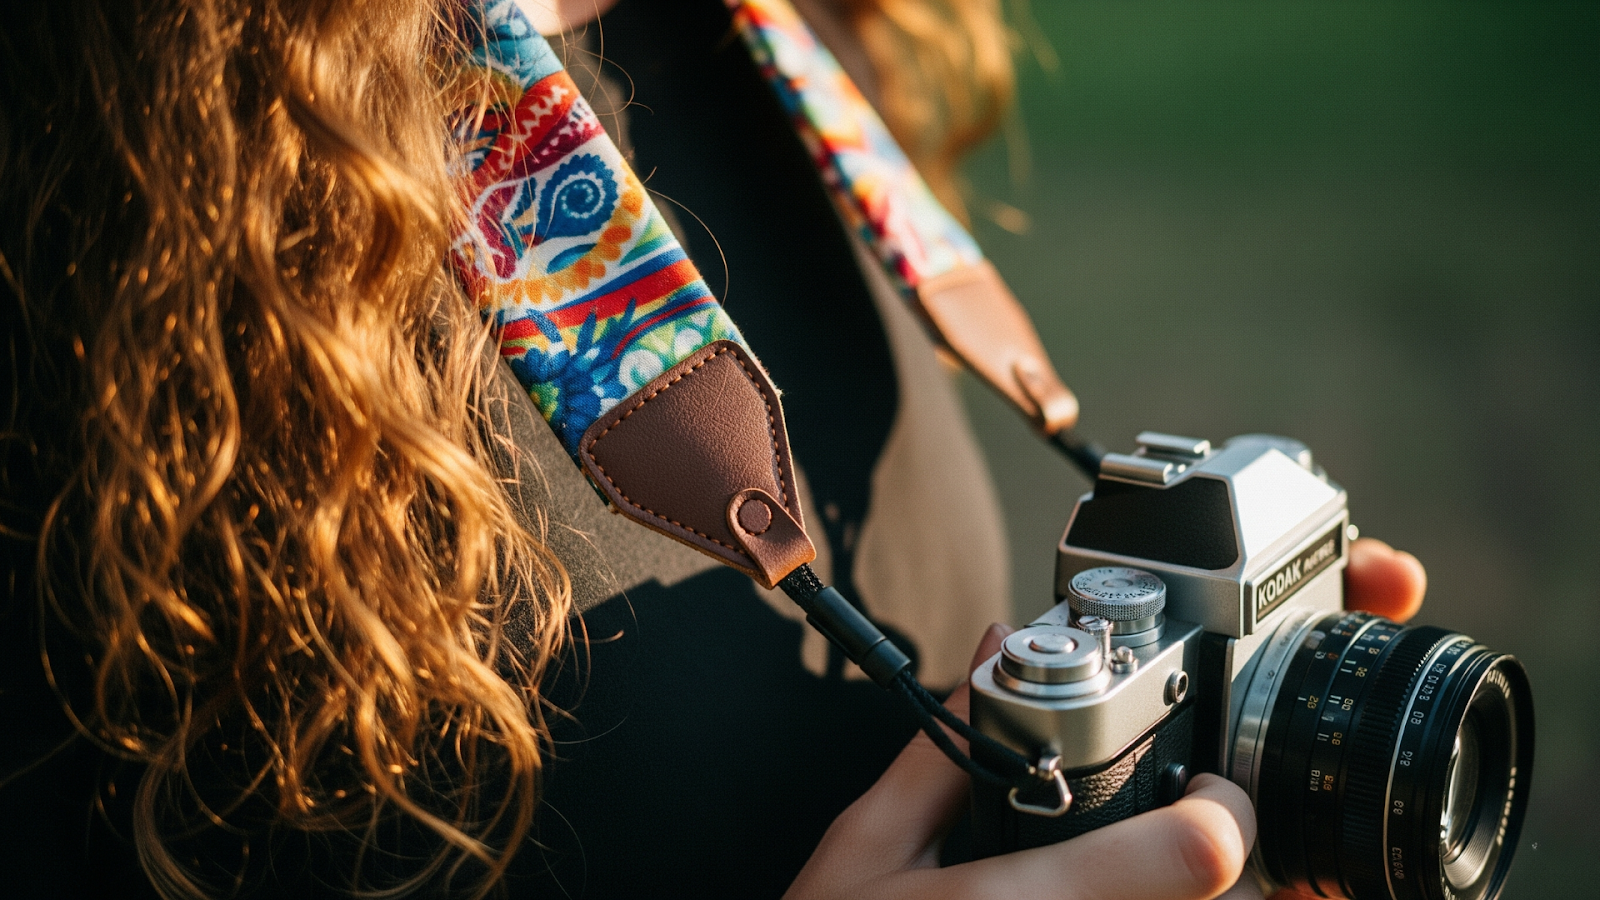
Create a comfortable and personalized camera strap that is far more beautiful than the standard-issue version.
What You'll Need:
-
A long, well-made scarf (cotton provides comfort)
-
Two small pieces of leather or felt
-
Two metal clasps or key rings
-
Heavy-duty thread and a leather needle
Instructions:
-
Fold the scarf in half lengthwise with right sides together and sew down the long edge to create a tube. Turn the tube right side out and press it flat.
-
Cut two small "H" shaped pieces from your leather or felt. These will hold the hardware.
-
Loop a metal clasp through the center of each leather tab.
-
Sandwich one end of the scarf tube inside a leather tab and glue it in place.
-
Using a leather needle and heavy-duty thread, stitch around the leather tab to securely fasten the scarf inside. Repeat on the other end.
Expert Tip: While silk is very strong, for a heavy DSLR camera, consider reinforcing the strap by using a sturdier fabric from a quality scarf or by braiding multiple scarves together
Caring for Your Upcycled Treasures
Once you transform a scarf into a new item, its care instructions change. An upcycled piece with mixed fabrics must be cared for based on its most delicate component. A cotton shirt with a silk pocket, for example, needs to be treated like a silk garment. To ensure your handmade treasures last, follow these simple steps.
-
Spot Clean First: For small stains, always try to spot clean before washing the whole item. Dab the stain gently with a soft cloth and a mild detergent; never rub, as this can damage the fabric.
-
Hand Wash in Cold Water: If the entire item must be cleaned, hand washing is the safest method. Use cold water and a detergent made for delicates to protect the fibers.
-
Press, Don't Wring: Never wring or twist your upcycled pieces, as this can stretch and distort them. Instead, gently press out excess water by rolling the item in a clean towel.
-
Air Dry Flat: The heat from a machine dryer can cause damage and shrinkage. Always air dry your creations by laying them flat on a towel or mesh rack away from direct sun or heat.
-
Iron with Caution: If you need to iron your piece, use the lowest heat setting appropriate for the most delicate fabric. Always use a pressing cloth between the iron and the garment to protect it.
Final Words
Giving an old scarf a new purpose is a wonderful way to hold onto your memories. It is also a creative and simple step toward a more sustainable lifestyle.
We hope these projects have inspired you to look at your own collection differently. Have fun turning those forgotten treasures into something you can love all over again.
And if this journey has you thinking about creating a brand-new story, designing your own custom scarf is the perfect next step. Visit the Ohscarf order page to do so!

.jpg?imageView2/1/format/webp)


Leave a comment